
Easy Paper Craft Step by Step
If you are looking for easy paper craft projects, you have come to the right place. There are many things you can make using construction paper, Origami, Papercraft3d, and Paper spinners. Here are a few ideas to help you get started. And don’t forget to follow the steps provided by the artist to get the best results. You’ll soon have a beautiful creation to show your friends and family.
Construction paper
If you’re looking for a fun and easy craft to do with your kids, consider an easy construction paper craft. These projects are affordable, versatile, and can be adapted to celebrate any holiday or season. Choose from a variety of colorful, holiday-themed designs, or use seasonal symbols. You can even create paper flowers for a birthday party! If you’re unsure of where to start, read on to learn how to make these fun projects.
Start with a stencil and a sheet of brown construction paper. Trace the stencil onto the brown paper. You should have two cones, one for each sheet. Roll the paper into a cone shape and then tape the outside of the cone to the foam ball. The finished project is a colorful, easy to make construction paper craft that can be decorated with glitter and other decorative elements. Make several for a fun party or to give as a gift.
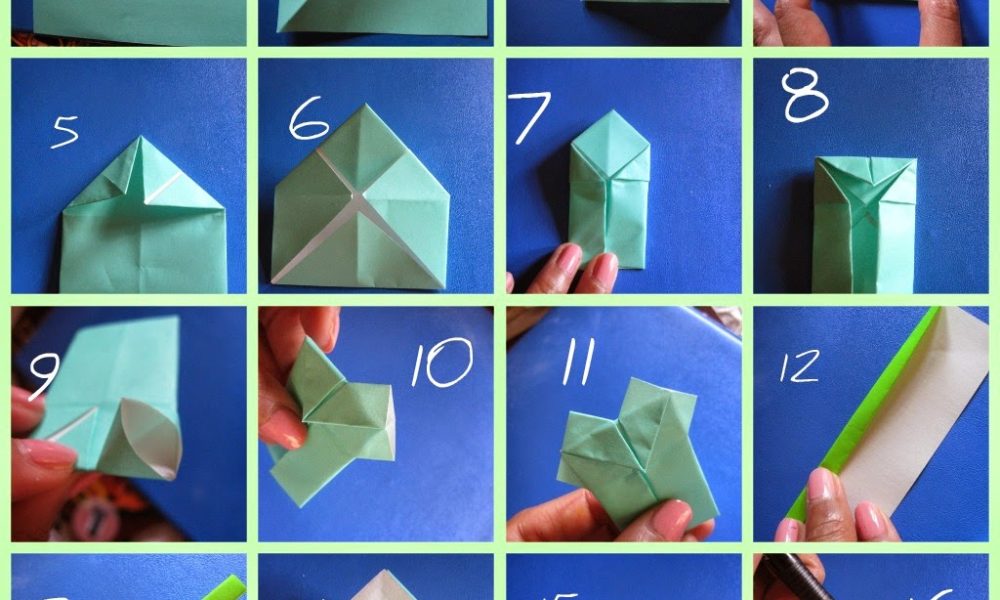
Origami
To create a mermaid, learn how to fold paper. To begin, you will need a square paper and red colored pen. Fold the sheet in half, then unfold it and fold again. Make the head and tail. Use a piece of green paper for the tail. Once the face and tail are finished, attach a ribbon and you’ve created a mermaid. Once dry, hang the mermaid to display.
Kids will love this hands-on, tactile activity. They can even make their own flower gardens and decorate them however they like. A few folds and your prehistoric pal is finished! Make sure to provide plenty of paper for this project. A few colorful pieces of paper will make a vase for a child’s creation. If your child has the patience and imagination to create her own masterpiece, try these easy paper craft projects for kids.
Papercraft3d
If you’re looking for a fun, inexpensive, and easy way to get your kids involved in art, try a paper craft. Paper crafts can range from simple drawings to 3D designs. And kids love them! Paper crafts are also great for developing design and manual dexterity. They also encourage the development of concepts like geometry, symmetry, and more. And the best part is, they won’t bore you!
Before you get started, always read the instructions carefully. And if you’re making paper crafts with young children, make sure you use non-toxic paints and supplies. Make sure to set aside enough time to complete the activity without interruptions. Alternatively, you can look for templates on the internet for kids and adults. These are available in a variety of formats, including jpegs, pngs, and even PDFs.
Paper spinners
If you’re looking for a simple and fun STEAM project for your children, then try making some paper spinners! This STEAM project is a great way to explore concepts like color theory, optics, and friction. Plus, kids will love the opportunity to exercise gross motor skills as they learn about friction and force. But don’t worry – it takes a little practice to get it right.
To start, fold the top of the spinner. This will give you four triangle-looking pieces. Fold the rightmost triangle of each triangle into the center of the spinner. The next piece of paper tucks into the fold you made in the first step. The final fold fits into the pocket created by the first fold. Once you’re satisfied with the size of your spinner, decorate it!
Paper placemats
For a unique way to present your plates, consider making your own paper placemats. To make a placemat, you will need two different colored pieces of construction paper. One piece of paper will be a mat, while the other will be a strip for weaving. Cut the strips to nine inches and then adhere them together with glue. Cut them in the desired pattern. If you want your placemats to be more elaborate, you can add decorative materials, such as ribbons or coins.
To start, cut two pieces of paper – one of the heavy papers (such as poster board) and one of the decorative ones. Choose decorative paper that matches the occasion and decorate the edges of the placemat. Then, use an edge-scraping scissors to create the desired pattern. Once the pattern has been cut, let it dry for at least an hour. Once the placemat has been fully dried, you can add decorative papers and other elements, such as ribbon or raffia.
Paper lanterns
The following steps will guide you through making your own paper lanterns. You can start by cutting strips of paper. The longer the strips, the more light they will let through. For a more flexible lantern, consider making the strips longer than the width of the lantern. The number of strips that you cut also affects the overall look of the lantern. Generally, they should be spaced about an inch or 2.5 cm apart. Once you’ve cut enough strips, tape them together or glue them together.
To decorate your lantern, you can use washi tape, ribbons, stickers, or gift wrap paper. You can even make them multicolored or in any combination of colors. These lanterns can hang, and they look great at parties, Christmas parties, and Chinese New Year. As long as they’re close to the size of a coffee can lid, they’re sure to make a statement. And don’t forget that you can use any color you like!